4.1 完整的形状检测流程
总目录:1.1 OpenCV介绍与学习路线 | 第四章:把知识连成项目 | 编号:4.1
← 上一节:3.7 凸包凸缺陷与Solidity | 下一节:4.2 摄像头检测与调参 →
4.1 完整的形状检测流程
前面每篇都在讲一个工具。这一篇把它们串起来:给一张简单的黑色几何图形图片,输出三角形、矩形、正方形、圆形或凹形。
它不是万能识别器,而是一份“怎样组织传统视觉代码”的模板。
一、先画出整条流水线
读取 BGR 图像
   ↓
转灰度 + 高斯滤波
   ↓
Otsu 反向二值化
   ↓
形态学闭运算连接小缺口
   ↓
findContours 找外轮廓
   ↓
面积过滤
   ↓
周长 + 多边形逼近 + 圆度 + 凸性
   ↓
分类、画轮廓、写名称和中心二、预处理:原图变成干净二值图
def preprocess(image):
    gray = cv2.cvtColor(image, cv2.COLOR_BGR2GRAY)
    blurred = cv2.GaussianBlur(gray, (5, 5), 0)

    _, binary = cv2.threshold(
        blurred,
        0,
        255,
        cv2.THRESH_BINARY_INV + cv2.THRESH_OTSU,
    )

    kernel = cv2.getStructuringElement(cv2.MORPH_ELLIPSE, (3, 3))
    cleaned = cv2.morphologyEx(binary, cv2.MORPH_CLOSE, kernel)
    return gray, binary, cleaned
这里假设“黑色图形、白色背景”,所以使用 BINARY_INV 把图形变成白色前景。你的场景相反时不要照抄。
三、提取轮廓并计算特征
contours, _ = cv2.findContours(
    cleaned,
    cv2.RETR_EXTERNAL,
    cv2.CHAIN_APPROX_SIMPLE,
)
单个轮廓需要:
area = cv2.contourArea(contour)
perimeter = cv2.arcLength(contour, True)
approx = cv2.approxPolyDP(contour, 0.02 * perimeter, True)
convex = cv2.isContourConvex(approx)
circularity = 4 * np.pi * area / (perimeter ** 2)
中心用 moments:
moments = cv2.moments(contour)
if moments["m00"] == 0:
    center = None
else:
    center = (
        round(moments["m10"] / moments["m00"]),
        round(moments["m01"] / moments["m00"]),
    )
四、分类与绘制结果
教学规则:
3 顶点且凸           → triangle
4 顶点且凸           → square / rectangle
圆度较高             → circle
不凸                 → concave
其余                 → polygon
这几个判断有顺序。如果先写“顶点大于 4 就是圆”,星形会被误判。
五、完整可运行代码
from pathlib import Path

import cv2
import numpy as np


MIN_AREA = 500
EPSILON_RATIO = 0.02
CIRCLE_MIN = 0.80
SQUARE_MAX_RATIO = 1.12


def preprocess(image):
    gray = cv2.cvtColor(image, cv2.COLOR_BGR2GRAY)
    blurred = cv2.GaussianBlur(gray, (5, 5), 0)

    _, binary = cv2.threshold(
        blurred,
        0,
        255,
        cv2.THRESH_BINARY_INV + cv2.THRESH_OTSU,
    )

    kernel = cv2.getStructuringElement(cv2.MORPH_ELLIPSE, (3, 3))
    cleaned = cv2.morphologyEx(binary, cv2.MORPH_CLOSE, kernel)
    return gray, binary, cleaned


def classify(contour):
    area = cv2.contourArea(contour)
    if area < MIN_AREA:
        return None

    perimeter = cv2.arcLength(contour, True)
    if perimeter <= 0:
        return None

    approx = cv2.approxPolyDP(
        contour,
        EPSILON_RATIO * perimeter,
        True,
    )
    vertices = len(approx)
    convex = cv2.isContourConvex(approx)
    circularity = 4 * np.pi * area / (perimeter ** 2)

    if vertices == 3 and convex:
        name = "triangle"
    elif vertices == 4 and convex:
        _, (width, height), _ = cv2.minAreaRect(approx)
        if min(width, height) <= 0:
            name = "quadrilateral"
        else:
            ratio = max(width, height) / min(width, height)
            name = "square" if ratio <= SQUARE_MAX_RATIO else "rectangle"
    elif circularity >= CIRCLE_MIN:
        name = "circle"
    elif not convex:
        name = "concave"
    else:
        name = "polygon"

    moments = cv2.moments(contour)
    center = None
    if moments["m00"] != 0:
        center = (
            round(moments["m10"] / moments["m00"]),
            round(moments["m01"] / moments["m00"]),
        )

    return {
        "name": name,
        "area": area,
        "perimeter": perimeter,
        "circularity": circularity,
        "approx": approx,
        "center": center,
    }


def annotate(image, contours):
    result = image.copy()

    for contour in contours:
        info = classify(contour)
        if info is None:
            continue

        cv2.drawContours(result, [info["approx"]], 0, (255, 0, 0), 2)

        x, y, w, h = cv2.boundingRect(info["approx"])
        cv2.rectangle(result, (x, y), (x + w, y + h), (0, 255, 0), 2)

        label = f'{info["name"]} A={info["area"]:.0f}'
        cv2.putText(
            result,
            label,
            (x, max(20, y - 8)),
            cv2.FONT_HERSHEY_SIMPLEX,
            0.55,
            (0, 0, 255),
            2,
            cv2.LINE_AA,
        )

        if info["center"] is not None:
            cv2.circle(result, info["center"], 4, (0, 0, 255), -1)

    return result


def main():
    image_path = Path("resources/shapes.png")
    image = cv2.imread(str(image_path))
    if image is None:
        raise FileNotFoundError(image_path.resolve())

    gray, binary, cleaned = preprocess(image)
    contours, _ = cv2.findContours(
        cleaned,
        cv2.RETR_EXTERNAL,
        cv2.CHAIN_APPROX_SIMPLE,
    )
    result = annotate(image, contours)

    cv2.imshow("Original", image)
    cv2.imshow("Binary", binary)
    cv2.imshow("Cleaned", cleaned)
    cv2.imshow("Result", result)
    cv2.waitKey(0)
    cv2.destroyAllWindows()


if __name__ == "__main__":
    main()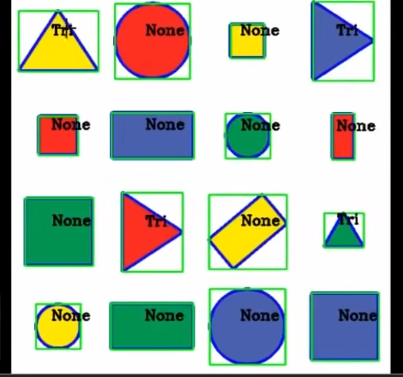
六、怎样把教学代码改成项目代码
1. 把常量变成配置
不同摄像头、距离和分辨率会改变面积与轮廓。把阈值集中放在顶部或配置文件,不要散落在函数里。
2. 返回数据,不要只画图
控制程序真正需要的是:
{
    "name": "circle",
    "center": (321, 238),
    "area": 5421.0,
    "confidence_like_score": 0.91,
}
画图只是调试输出。
3. 用样本集验阈值
至少保存:
- 正常光照;
- 过亮与过暗;
- 不同距离;
- 目标旋转;
- 干扰物;
- 应该找不到目标的负样本。
4. 不要让分类函数偷偷做全部事情
预处理、候选提取、特征计算、分类、绘制分开,未来才能替换其中一步。下一篇会把它放入摄像头循环。
← 上一节:3.7 凸包凸缺陷与Solidity | 下一节:4.2 摄像头检测与调参 →
留言区
不收集任何个人信息;昵称只绑定浏览器里的随机 Cookie。